All the Universe has conspired against me not being able to build the doors for this cabinet.
First, my router that I've only had for about five years froze up on me. It had been getting harder and harder to adjust it over the past year or so and finally refused to adjust at all. And I had already spent nearly $100 on those nifty cope and stick router bits.
So, we went and bought a new router. I determined that I'm not going to buy any more Ryobi tools based on past experience, and having had nothing but good experiences with Porter Cable, we bought the 2.25 horsepower fixed base P/C router at the local Home Depot. (they honored Lowe's $25 coupon so that helped)
It was when I got it home, anxious to try it out, that I found that my low-end, somewhat ancient, Sears router table wouldn't fit my new router without modification. My little bride is beginning to expand her vocabulary by osmosis, and not necessarily in a good way. But the old barn is good for containing such outbursts and I'm sure the neighbors have scarcely lost any sleep.
Yanno? If you're going to go to all the trouble of making your router table fit your new router, you may as well have the router table you want. And I've been lusting after a router station that I can use on my work table and put away when not in use. (Shameless plug) Google, as you know, is our friend. And Google introduced me to Router Table Depot Dot Com. I got the large router table build kit, and I have to recommend this place. It was fast, accurate, easy and reasonable. I'll post pics of my new router station next time I go to my secret offsite location where the pictures post.
So, I mount up my new router and take it for a spin, making a little raised panel door for one of the cabinets in my shop. As a prototype, it fit the opening and confirmed all of my measuring theories. But as a door, it's not a keeper. As a learning experience it was priceless.
Then the new router broke. And Home Depot only had the display left. And I wanted it now. So I talked them into letting me swap out the motors which was all I needed anyway.
Okay, back in business. I made the first two doors, stuck them in the opening and threw my shoulder out of joint slapping myself on the back. It was a gleeful meeting of the self-congratulatory committee of the self-admiration society. What an astonishing cabinet maker I am with so little training!
I quickly whipped up the next two doors and started gluing them together without a dry fit. I'm that good, you know. And they didn't go together real snug, but that's why God invented clamps, right? I squeezed those bad boys together making for a beautiful fit. Left them in the clamps and went in the house for a celebratory beer.
When I loosened the clamps I heard a sickening cracking noise and learned a really valuable lesson: Wood is the size it wants to be, not the size you wish it to be. And when you take the pressure off of it it shows you who is boss. And you feel a little sheepish about how cocky you were. And you realize that this stuff is harder than it looks. And you buy eleven dollars worth of boards and start over.
And you give it a dry fit before you put any glue in the joints.
Saturday, January 03, 2009
Thursday, December 18, 2008
The dearth of posting on this site has not been intentional. Far from it. I can hear all of you shaking your heads and saying, he's lazy, he doesn't post because he's lazy, and he's lying to us about that right now. But really, that's not the case. Really.
I've actually been trying to post this for quite some time. For some odd reason, when we switched over to AT&T's "Uverse" for our cable and phone and internet, I haven't been able to post pictures on blogger. (If anyone knows the solution to this, please comment.) So, I have forwarded these photos of our latest project to a secret off-site location that I go to during the day. And I'll post them from here. But keep that just between us, m'kay?
As several of you already know, the little bride has been after me to build bookcases in the den for her gi-normous collection of crafting/art/sewing/silliness books. I put her off for some time by telling her that we need a cabinet shop to do cabinet work, and she's been quite forthcoming in helping me to put that together. Then I put her off by saying that she needed to complete at least one project. I honestly can't remember if she actually did that or if she bamboozled me, which she is prone to do. But we began work some weeks back on the den...
First we set up a production line process to cut out the shelves and other parts.

remember you can clicky the picky if you wanna see 'em bigger...
we're kind of skipping ahead a little here, and getting on with the installation. The miracle of time-lapse photography...
Here's a peek at the adjustment system we wound up going with. I found it on Charles Neal's website. It works well and is a good use of the scrap plywood left over from cutting out the carcass.
The system consists of 2 strips of plywood, 1.5" wide for each side of the section. They're all taped together and run through the dado blade on the table saw in 2 inch increments, utilizing a shop made jig for the spacing (much like a box joint jig, only bigger.)
This keeps the spacing exactly the same across all of the units and you insert a strip of wood in the slots as a support on each end to hold the shelf up. You'll notice in the photo above that the shelves are all notched at the corners to fit nicely in the unit.
You can see in this detail that we've taken the three carcasses and screwed them together at the sides. This proved to make the installation of the face frame a bit (no, a lot) more difficult due to some bowing, but this was mostly corrected with some long pipe clamps and a lot of cussing.
If you look closely, you can see the cussing.

Here's a little detail of the top of the base unit. We found this behemoth poplar board that was 14 feet long and over 13 inches wide to use as the counter top. I think it would be really fun to say that I used one of my hand planes to do the molding on the edges, but I don't have that profile yet, so it was routered on there the old fashioned way - with a big Ryobi router. As a side note, this turned out to be Ryobi's last project. He had been becoming more and more difficult to work with over the years, finally to the point where I had to put a clamp on him just to adjust the depth. All of that came to an end after this counter top, when Ryobi refused to loosen up and adjust even a little.
So, we're not going to replace him, we're going to use this as an opportunity to work entirely with hand tools from now on. Ha ha! Gotcha on that one! We bought a Porter Cable and he's a little dandy! But I digress. Okay, here's the first unit complete. Sort of. The bride couldn't wait to get her books in there...
I still have to build the doors that go on the bottom. More on that later...
Monday, July 21, 2008
Pool Table
Our next door neighbors bought an umbrella to go next to the pool. After setting it up, we noticed that it said not to stand or sit on the base. The base is filled with water, by the way. So, I said, why don't we build a table to go over it and keep the kids off of it?
Coincidentally, I had just come into possession of a batch of nice cedar from the man with the sawmill up the street. So we banged a table together Saturday afternoon and put a couple of coats of spar varnish on it...

the varnish really makes the grain on the cedar "pop", don't you think?

Coincidentally, I had just come into possession of a batch of nice cedar from the man with the sawmill up the street. So we banged a table together Saturday afternoon and put a couple of coats of spar varnish on it...

the varnish really makes the grain on the cedar "pop", don't you think?

Sunday, June 29, 2008


Sunday, March 23, 2008

Unintended Consequences
I don't know if it's a law, but there's this thing called unintended consequences. That's where you do something with the intention of fixing something and wind up breaking something else. You know, like when you send food to a starving country and the farmers in the next country over go out of business.
I've got this problem where I have to wear a shirt with pockets in order to carry my glasses and a pen or pencil, and then they're always falling out when I stoop over any way. And if I try putting them in my pants pocket they get broken and bent. So this rules out wearing most T-shirts when it's warm. So I'm thinking about how handy the overalls that the old men wore must have been. Organizers in their own cosmos so to speak. A place for everything including your chaw. Not that I chew.
I haven't had a pair of overalls since I was a kid so I went down to the dry goods store to look at them the other day. I really like my Carhart pants and their version of the overall is pretty cool with the reinforced knees and tan color. That duck cloth has proven to wear well too. But they didn't have my size and besides, they were fifty bucks. So I went a counter or two down and found the Brazos brand knock-offs for half the price. I'm in a devil may care mood that day, so what the heck, I buy me a pair of those and a few boxes of ammunition for good measure. (You can't have too much ammunition on hand, besides, it's better than gold in hard times.)
Well, I spent about nine hours in the shop yesterday (finally finished that saw bench I started and built the little bride a wall and doorway for her shop) and marveled at how handy my pencil was and how comfortable and breezy I felt. But towards six o'clock I started to become painfully aware of a little unintended consequence that never in a hundred years would have crossed my mind: apparently all the movement under the bib of those cosmic organizers abraded the ends off of the nipples on my chest. I didn't need much of an excuse to change out of my saw-dusty clothes last night because my man-boobs were on fire.
Barely able to even wear a shirt this morning, my little bride was teasing me, "do we need to buy you a bra?" Well, no, but I may need to tape them or put bandaids or something on them next time... Actually, my theory is that if I had worn a plain T-shirt under them instead of one with a big silk-screened logo on it, I might have been okay. Sometime after I heal up, I'll give that a try.
Thursday, March 20, 2008
Comfort Tools
One of the blogs I read had a posting, "Daddy has a saw problem." And you may or may not want to admit it, but I think many of us find tool buying a comfort compensation. I have lots of addictive behaviors. I can eat with the best of bingers. I can drink most folks under the table. And I get enormous amounts of satisfaction from buying tools.
After my failure with the saw bench, I went tool shopping today and brought home a few odds and ends. Believe me, I feel better.
 I found this one really cool tool dealer that had all of these things. In fact, everywhere else I went was bust.
First there was this great set of auger bits. It even includes the adjustable hole bit for doorknobs. And they are sharp. Yes, I couldn't wait to get them home and try them, drilling several holes in my work table. I'm like a kid that way.
Then there was a really cool saw set that adjusts to the number of teeth per inch your saw has. It was only six dollars so I figured I should get it. The tool-man asks me if I have a saw vise to use it with. Well, no, do you have a decent one? Yep, out comes a pretty decent user for only $19.00.

Lastly, there was a cool hewing hatchet for only $16.00 and I had to get it even though it's left handed. Anybody out there got a right handed hewing hatchet they want to trade?

After my failure with the saw bench, I went tool shopping today and brought home a few odds and ends. Believe me, I feel better.
 I found this one really cool tool dealer that had all of these things. In fact, everywhere else I went was bust.
 First there was this great set of auger bits. It even includes the adjustable hole bit for doorknobs. And they are sharp. Yes, I couldn't wait to get them home and try them, drilling several holes in my work table. I'm like a kid that way.
Then there was a really cool saw set that adjusts to the number of teeth per inch your saw has. It was only six dollars so I figured I should get it. The tool-man asks me if I have a saw vise to use it with. Well, no, do you have a decent one? Yep, out comes a pretty decent user for only $19.00.

Lastly, there was a cool hewing hatchet for only $16.00 and I had to get it even though it's left handed. Anybody out there got a right handed hewing hatchet they want to trade?

Limitations
 One of the great joys of this cabinet shop project is learning as I go. And don't get me wrong, I'm not giving up, but my first attempt at a saw bench was a disgraceful failure. This should be a really simple project, right? I mean this is something you would have your apprentice do to get his chops.
Maybe it would help if I had anyone besides the internet to show me how to do these things.
Doing my due diligence, I went and looked at pictures and plans from some of the big dogs and little dogs on the net and thought maybe a sort of hybrid between Schwartz and the plywood one would be really cool. It would if I had me some mad tight sawing skillz to begin with. But making due with what I have, I cut and chiseled out a fabulous ten degree angle with sliding dovetail sides to fit my legs in. I gotta say, I was really pleased with myself when I got done.
 Then I sawed and pared out the "tails" doing my best to figure the ten degree corresponding angles. This too turned out really nice and I kind of hurt myself patting me on the back. Then disaster struck.
I tried to put the two pieces together. Wow, that really sucks. You look at things like this and realize how much paying attention in high school math might have paid off years later. Oh well. I guess I need to go to plan B, but I'm not sure what that is at this point. All I know is it most likely won't involve ten degree angles.
Sunday, March 16, 2008
Leg Vise
 I picked out a scrap piece of oak and planed it down for my leg vise. I used my make-shift clamping system with the holdfasts and my work table.
 I gave up trying to thread my dowels and broke down and bought an old wooden screw clamp with one inch diameter screws. This will be strong enough for the leg vise and if it's not, I'll figure something else out.
 I attached the screw through the front vise board and the front left leg and screwed it into half of it's original clamp.
 Then I used an 1.5" forstner bit to wallow out behind the screw head, chopped a little trench to get it started, and pushed a piece of dowel through the screw to hold it to the front vise board.
 I took a piece of 1 7/16" dowel and drilled holes about every inch in it. I drilled a quarter inch hole through the edge of the face board, going through the end of the dowel and pinned them together with an oak dowel. I found a little piece of steel bar to use for the adjustment. This way I can let the base of the vise out if I clamp wider objects.
 I couldn't wait to try it. It clamps boards just fine. I think this is going to make finishing the other vise on the end much easier. Things are progressing faster and faster...
 Son2 tries it out and planes a pine board.
Wednesday, March 12, 2008
Bench Part II
So, the next thing I needed to do on the bench is install the tool tray and the bread board ends. I sawed down about 3/4" and chiseled out a rabbet around the ends.
Then I chopped out, (what do you call it?), a mortise to fit on the ends,

cut a dado and fit the bottom of the tool tray to the left side board. No glue, just friction to hold it. At this point I have the end boards temporarily screwed into the bench so I can get accurate measurements. Of course that didn't mean that I cut it correctly on the first try, but at least it was long and I could trim it down instead of the other way around.

Each of the end pieces and the tool tray are pegged in place with octagonal cut oak pegs.

Then I cut the ramps and fitted them into the ends of the tool tray.

Finis (except for the vises - stay tuned.)

(remember you can click the pics and make 'em bigger if you want to...)
Tuesday, March 04, 2008
Work Bench
I decided to go with the good, fast and cheap bench that consists of laminating 2-by southern yellow pine boards into a thick and hopefully durable bench. I followed the advice of only gluing one board on at a time. In order to get fairly clear lumber, I bought 2x10's and ripped them in half. I used a cheap little detail roller to roll the glue on and left it soaking in a bowl of water between uses since I'm waiting at least a day between glue ups.
 Sometimes I waited longer than 24 hours if it turned off cold. Or if I got discouraged trying to figure out what my next step was going to be.
 Honestly, I agonized over how I was going to cut the dovetail shaped mortises for the legs to attach to the top. Realistically, I should have gone with something simpler but that's what I really wanted from an aesthetic standpoint. Just my reluctance to commit to this cost me at least a week or two.
 But at last I had the top as far as I can go until I do the tool tray and vises, so I figured it was time to attach some legs. I layed out the mortises for the stretchers.
 And then chopped them out with my largest mortising chisel. I bought the set of C.I. Fall mortising chisels because they were about half to 1/4th as much as the higher priced mortising chisels.
 I may have found out why they cost less. I should mention that this is the first time I've actually cut mortises and maybe I don't know what I'm doing. No, really. I probably don't know what I'm doing, but I split the handle pretty bad by the time I had four mortises chopped. And, due to my lack of experience, I split two of the legs trying to fit the first tenons in. I guess you're not supposed to force them. You can see the split on one of the back legs in the photo, but it still seems to be holding the table up well enough.
 The leg joints turned out to be acceptable, and I planed the top flat over a period of a couple days. You can believe me when I tell you that after you have chopped the mortises in four legs, sawed the tenons, and planed for about forty five minutes, you really become aware of the muscles in your arms. And this awareness heightens the next day. I felt like Popeye. My arms felt that big.

 Here's a pic of my son sawing the first board on the new bench with the bench hook he helped me build. This is really good exercise and I hope to do it often enough to get in shape. Not building benches, but building something. I'm trying to decide what my next project is going to be.
 Sometimes I waited longer than 24 hours if it turned off cold. Or if I got discouraged trying to figure out what my next step was going to be.
 Honestly, I agonized over how I was going to cut the dovetail shaped mortises for the legs to attach to the top. Realistically, I should have gone with something simpler but that's what I really wanted from an aesthetic standpoint. Just my reluctance to commit to this cost me at least a week or two.
 But at last I had the top as far as I can go until I do the tool tray and vises, so I figured it was time to attach some legs. I layed out the mortises for the stretchers.
 And then chopped them out with my largest mortising chisel. I bought the set of C.I. Fall mortising chisels because they were about half to 1/4th as much as the higher priced mortising chisels.
 I may have found out why they cost less. I should mention that this is the first time I've actually cut mortises and maybe I don't know what I'm doing. No, really. I probably don't know what I'm doing, but I split the handle pretty bad by the time I had four mortises chopped. And, due to my lack of experience, I split two of the legs trying to fit the first tenons in. I guess you're not supposed to force them. You can see the split on one of the back legs in the photo, but it still seems to be holding the table up well enough.
 The leg joints turned out to be acceptable, and I planed the top flat over a period of a couple days. You can believe me when I tell you that after you have chopped the mortises in four legs, sawed the tenons, and planed for about forty five minutes, you really become aware of the muscles in your arms. And this awareness heightens the next day. I felt like Popeye. My arms felt that big.
 Here's a pic of my son sawing the first board on the new bench with the bench hook he helped me build. This is really good exercise and I hope to do it often enough to get in shape. Not building benches, but building something. I'm trying to decide what my next project is going to be.
Tuesday, January 15, 2008
I'm going to learn to do this...
There was a time when one of the things a gentleman learned was how to cut dovetails for making drawers and other joints. Anybody that knows me will tell you that I'm no gentleman, but hand cutting dovetail joints is something that I have wanted to learn for a long, long time.
With some of the upcoming projects that the little bride is dreaming up for me, I guess now is the time. This is my third try. First attempt was crazy backwards and mixed up and nothing matched up. Second attempt was a mirror image of what I needed and the joint would not hold up. This is a picture of my third attempt and while not elegant or pretty, it is tight and effective and I think I'm on the right track.
 Hand cut dovetail joint. (click the picture to make it bigger)
Saturday, January 05, 2008
Miter Saw Bench
 (remember, click the pictures to make them bigger...)
As I've mentioned before, when we moved in we just threw everything into the shop and have never gone back to try and sort it out. Sure, working on projects can be a challenge when it's like this, but we've dealt with it one way or another. But with the new projects that the little bride is coming up with, bookshelves, kitchen cabinets, etc. I figure I'm going to have to organize and configure it as a "cabinet shop."
My first project towards that end is to clear some floor space and build a miter saw bench. I just figure this will pay dividends when it comes to production cutting. So this weekend we did just that. I built the framework last weekend and had the local home center rip a couple of sheets of 3/4" mdf in half for me. Today I put the top together. I think it's going to work out well.


Next project: my woodworking bench.
Thursday, October 11, 2007
Saturday, October 06, 2007
Deck, Phase II
Basically, phase 2 of the deck is complete. Sorry no "in-progress" pics, but this turned out to be one of the more stressful projects we've done so far. At least for me it was. First of all, I had no idea that the little bride intended to paint phase 1 like a circus wagon. But she did. Anyway, here are some photos to show what we did. (remember, pics get bigger when you click 'em)


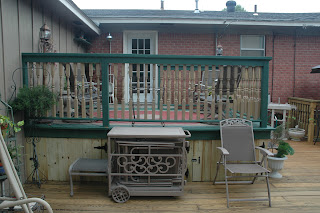

Note the little doors under phase 1. Now the bride has a large storage area for her junk underneath.


Note the little doors under phase 1. Now the bride has a large storage area for her junk underneath.
Thursday, July 26, 2007
Weedeater Woes
I'm not ashamed to admit it. Well, maybe a little. But edging with a string trimmer has been a source of aggravation for me lo these many years. And it's probably due in no small part to me not knowing what I'm doing. I've stared wistfully at the guys doing the neighbors yards as they zip up and down the sidewalks and curbs with their string trimmers. I can't remember ever seeing one of them stop to fiddle with the string.
Me? The string breaks every foot or so and jams up so that I have to kill the motor and fish it out, most of the time having to re-wind the spool. It got so bad that I finally gave up and quit edging all together. The man next door either felt sorry for me or was so embarrassed that he started edging my flower beds and fence.
I've seen those replacement heads at the garden center, you know, the ones where you put the little pieces of string in them instead of a spool. They tout things like, "5 second line change!" And I've been really hesitant to shell out twenty bucks to find out if they work or if you've just bought yourself twenty more dollars worth of aggravation. I still can't help you with that one because I didn't buy one of those.
I did run across a little blurb on-line the other day about a father-son team down in Texas that were experiencing the same frustration as me and invented a better solution. I read reviews about it on their blog and was impressed with how impressed everyone seemed to be. They got me at, "We absolutely GUARANTEE YOUR SATISFACTION!!!" I couldn't wait to get down to Wal Mart to buy one.
Being late in the season, Wal Mart was either completely out, or never actually stocked the Pivotrim heads and the lady stocking the shelves in the garden department acted like I was crazy. But I was on a mission and I drove nine miles up the road to the Super Center in the next town. I looked and looked up and down the aisles and just as I was about to give up, there in the corner, turned backwards and kind of tossed aside, was a blister pack that looked promising. As I turned it around I realized that this may well be the last remaining Pivotrim head in the state of Arkansas. I took it to the cash register with trembling hands.
Now, all of the replacement heads claim that they fit 99% of all trimmers and they probably do. Pivotrim is no different saving that they claim to give you more hardware and therefore more options for, I guess, more different trimmers. Sheesh, I don't know. All I know is that when I went to put this one on my Weedeater, nothing they provided looked like it would work. The package boldly states, "problems? No need to return to the store, call our toll free number..."
Yeah, right. On Sunday afternoon? Oh well, I dialed the number and it was immediately answered by one of the inventors. He confidently told me exactly what to do in a very clear and concise manner which made me immediately suspicious that as soon as I got off the phone I would realize I had been had and he would have taken his phone off the hook.
But surprise, in less than five minutes I had the head changed out, strung up and was ambling into the front yard to experience some serious, trouble-free edging. Now, I read all the claims about being able to go for up to four hours without a line break and guys bragging about trimming up a couple thousand acres of chain link fence with this thing, but remember, I'm the guy that can't go more than a foot or two without breaking the line.
I'll give it this, it made it nearly all the way across the front yard before my first break. But it does re-string in a matter of seconds and I was able to do the entire yard - all of the curb, both sides of the driveway and sidewalk and all of the flower beds with only four string changes. Much better than the twenty or so changes I normally experience and my blood pressure didn't burst my ear drums.
I was a little disappointed that the package said it would take .095 thick string, and I bought a package of that size string already cut into strips, but they wouldn't fit through the little holes. I did find that you can take the old spool of .080 string from the tap and go days and cut it into 10-12 inch strips quickly and easily which works just fine and I'm sure is cheaper than paying four bucks for a little tube of strings.

Go to their website, check out the video and see if maybe this might be a stress reducer in your life. It seems to be for me...
Saturday, June 09, 2007
The Deck - Phase I
You may remember that we put a door in the back of the house where a bedroom window was originally. That necessitated building a porch to get down to the ground about four feet below. This seemed satisfactory for a year or so. And then the bride got the itch. "I want a deck," she said. So we started to dismantle the railings on the porch...
(don't forget you can click on the pics to make them bigger.)

...began to frame up a deck...


...and started laying the flooring. I decided to lay the flooring on a 45 degree angle so that it wouldn't look so much like an afterthought as it transitioned from the old porch structure. I think once it's all stained the same color it will look like it was always there.


Next step was to trim off all the uneven boards and start on the railing.

The bride picked out the style of railing she wanted, and it was up to me to figure out how to make it work...


I think it looks pretty good.

Now it's time to relax...

Uh oh, the bride has informed me that this is phase I of the deck construction. Phase II will be a lower level deck... sheesh, it never ends. Stay tuned.
Subscribe to:
Posts (Atom)